Right Click Protection

Wednesday, August 8, 2012

How to partition a Hard disk the Easiest way without formating


It is known that every device must have some form of storage, it shows how important Hard drives are for its use, HDD technology has been evolving even as I type now, from HDD(Hard Disk Drive) to SSD(Solid State Drive). Hard disks are used mainly for storing user data, other media or important documents and even backup of your system, but a problem arises when you have only one Hard disk and you need to use the only one for both purposes like Backing up your system and another partition for Storing Media or for any possible reason you would like to partition your Hard disk for.

Well it’s all possible now the easy way, thanks to Easeus Partition you can easily partition your hardisk into different types of file systems at a click of a button. Easeus is highly praised software for its partitioning capabilities on the fly without the need of formatting the whole Hard drive again. It was once known as Partition Magic but they changed their product name to Easeus Partition Master.

To partition your hard drive is even possible using the native windows utility diskutil.exe but it doesn’t have as more options for partitioning as Easeus Partition Master. To use Easeus follow the steps described below:

Step1: Download Easeus Partition Master Home Edition then proceed with the installation.

Step2: After installation, run the program on your Desktop. Select the drive you want to partition and you will have five options on the top, Select Resize/Move.


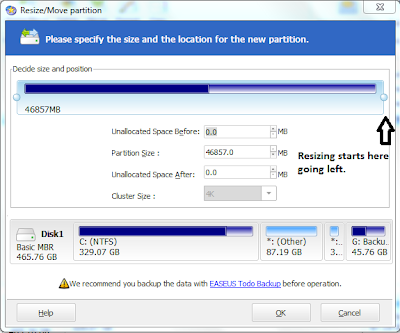
Step3: On the Resize/Move window, just resize the drive you selected by dragging the bar from Left to right to divide the hard disk into two parts and click OK.


Step4: You will see a new “Unallocated” disk on the list of your disks. Just select it and click Create then OK, last of all click "Apply" to start the operation. That’s it! You will have your newly created Partition.


I hope this has been the easiest guide to understand as anyone can do it pretty easily with the help of images. Don’t forget to click the Facebook like button below and follow us on Twitter @techintz

Saturday, August 4, 2012

Where to buy the Nexus 7 in Africa?


Lately in the tech industry, a new mind blowing gadget was unveiled, which is the Nexus 7. It was announced on 27th June 2012 on the Google I/O 2012 Event, priced at 199$ for 8GB version and 249$ for the 16GB version, many reviewers from different sites loved and praised the tablet for its astonishing performance and best of all is its price.
  
Where to buy the Google Nexus 7 in Africa?

The launch countries for the Nexus 7 where only Australia, Canada, UK and USA so this literally confirms that Google has no plans to launch the tablet in other countries soon. But how and where can you buy Nexus 7 in Africa as you can’t wait for its availability locally?

Check the following list of Online retailers that ship Internationally that includes Africa and other continents.

1.Bhphotovideo.com

They sell the 16Gb version for 249$ and shipping costs are at 83.77$ shipping which takes only 3-5 days to arrive in Africa. You can order from them as they are currently on stock.


2.Ebay.com
EBay has many sellers selling the tablet for a premium because it’s still a new arrival but if you want to buy it on Ebay.com its 312$ for the 16Gb version and 55$ shipping cost anywhere in Africa.  They are currently in stock on EBay.


3.Adorama.com
You can order from this online retailer, they do ship internationally, they only sell the 16GB version for 249$ and shipping costs to Africa is 115.45$ which is a bit high I may say but if you want to have it faster you might want to pay the premium so you can be among the first to own this tablet in Africa. They will be having limited stock so stay tuned.


So these are the online retailers we can recommend on where to buy the Nexus 7 in Africa or in Tanzania I may emphasize. You may have to hurry up to buy the tablet as soon as its on stock as it sells out pretty fast. If you know elsewhere the Nexus 7 is available be sure to leave a comment in the comments section below. Don’t forget to like this article on the Facebook like button below if it helped you, not to forget you can follow us on Twitter @techintz for the latest tech news.

Sunday, July 29, 2012

How To Easily Change The Windows 7 Login Screen Image

Since day one I might guess that you are only using default Windows 7 login screen background image, which is rather boring and not appealing anymore. But do you know that you can easily change the background image of the Windows 7 Login Screen?

Well look no further as in today’s post I will guide you my readers on how to change the Windows 7 Login screen image. Yeah, the default Windows 7 login screen background image is rather "fine" but what if you needed to give it more personally, or to change it because you are tired and need change.
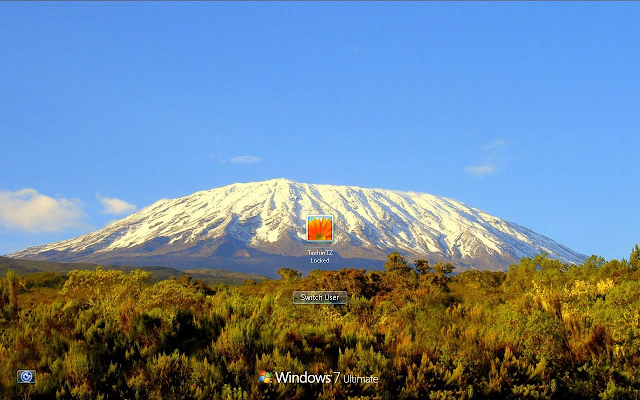
So how do you exactly change the Default windows screen from this.

To another image?easy..
Just follow the steps below:

1. Download Tune-up Utilities from here.

2. After installing, Open Tune-Up Utilities on your Desktop and click the "Customize windows" tab then under it click "Logon Screen"


3. Click on "Create new" to select a picture of which you want as your Login Screen Background, go to "Search local drives" and select your image.

4. After selecting your image, click "Save logon screen" and provide any name and save it!

5. Just apply the new logon screen you created by clicking "Apply" and OK.
Finally you will have your new Logon screen after applying, Awesome! I hope this has been informative for you and please follow us on twitter @techintz or like us on Facebook on our Page. Have any questions? Let us know down in the comments section below.

Sunday, July 22, 2012

How to Combine/Merge/Join/Open Files with .001, .002 Files


When downloading different type of content from the internet, you might find that some of the files that you download have been split into many parts like .001, .002, .003. First thing to know is that these files are not split archive files and you can't rename them to .rar extension for them to extract cause you will end up with an error extracting content.To combine the .001, .002 files together you need a software called HJSplit. I will be explaining in the following easy steps on how to combine these types of files using HJ-Split below:

  • Download HJSPLIT from here.
  • Open HJSplit and click the Join button. 


   NOTE:Make sure you have all the .001, .002, .003 files together in one folder
  • Click the Input file option, choose the first .001 file in the folder its located.

  • Click Start, it will start joining all the files together to make one final file.


I hope this post has been informative for you, if you have any comments please let us know at the comments section below. Don't forget to like us on Facebook and follow us on Twitter @techintz


Saturday, June 16, 2012

How to share your internet connection wirelessly with Windows 7


As many of you know more internet users increase daily which is by then becoming part of our lives and what is behind social media through using Facebook, Twitter not to mention many other sites, people are paying more for internet subscriptions to their ISPs in one building, but what is the solution if you only want to pay for one subscription and share the internet connection all over your house?

Look no further as you can now easily share your broadband or Airtel/Tigo/Vodacom or Zantel 3G internet connection wirelessly without extra cost of buying a MIFI device, you can use your Laptop or Personal Computer to share your connection free of charge using a program called Connectify.

Connectify features:

-Easily create a Wi-Fi hotspot to share and collaborate with your friends, co-workers, and mobile devices.
-Got a mobile broadband card or adapter? Now you can share that single connection with all your other devices!

How does it work?

It’s easy! Listed down are the steps:

1. Download Connectify 1.2 from here, install it and access it down the system tray on the bottom left of your desktop.

2. Configure Connectify  by filling in your preferred Wi-Fi name, password and the internet connection which you want to share wirelessly.


3. Finally, just click the “Start Hotspot” button to start your hotspot and BAM! You have now successfully shared your internet connection wirelessly!


NOTE: If you have any firewall enabled then you need to disable it to allow other devices to connect to your Wi-Fi hotspot.


I hope this has been informative for you, don’t forget to like us on Facebook and follow us on Twitter @techintz, didn’t understand any step? Let us know down the comments section below.

Monday, June 11, 2012

Apple WWDC 2012 Event


Apple the company behind the highly successful iPhone and iPad are having a “World Wide Developers Conference” event today at 7:00 PM Dar es Salaam night time. Rumors are that they are announcing the all new major update of their iPhone operating system which is iOS6 with many features rumored as the revamp of all the stock apps including a new enhanced Camera interface, 3D-Maps for more and easier navigation and they might even unveil easier ways for developers to seamlessly create iOS apps in a much easier way for all devices, so developers stay tuned!

We are expecting the announcement of the final version of Apple’s desktop Operating System which is Mac OSX Mountain Lion on the event including a new lineup of Mac Book air, MacBook Pro and Mac Pros so you won’t want to miss out this important event.

If any of you are fans of Apple’s products don’t forget to watch the video of the Event here once it finishes. Again, share this post with your friends and like us on Facebook, follow as on twitter @techintz and what are your expectations? Let us know from the comments section below.

Update:
The videos of the event are already uploaded on youtube, I have embedded the videos below for your viewing pleasure:

Thursday, May 31, 2012

How to Remove Remaining Unwanted Programs


Ever had a program that's installed in your system and wanted to uninstall it but whenever you try to fully uninstall it, some unwanted remaining files of that program would still remain on your computer?

That’s so annoying especially us here in Tanzania most of the users are using Windows Operating system so many of the programs will still leave some unwanted dll files, registry files or even shortcut which you would like to get rid of completely.

So upon my busy days surfing on a local internet café in Dar es Salaam, I found a really nice software which would be used just for the purpose of fully uninstalling programs which don’t example have an uninstallation file or maybe just a normal program it will automatically remove for you all the unwanted files the program leaves and any traces of the program from the registry so therefore it will save you more disk space.

Software’s name is Revo Uninstaller you could get the free version or the Pro version if you loved it so much.Revo uninstaller has many other features listed in its site just go check them out, so what are you guys waiting for? Just go ahead to www.revouninstaller.com and download the latest version of Revo Uninstaller. Don’t forget to follow us on Twitter @techintz, like us on Facebook and last but not least to leave us a comment below on how you really loved Revo Uninstaller for your uninstallation needs.

Saturday, May 12, 2012

Zantel Officially Launches 3G Services in Zanzibar


For those who didn't get the news yet, Zantel has officially launched 3G service in Zanzibar. Which means Zanzibar is now enjoying full 3g service treatment on both islands Unguja and Pemba with full coverage whenever you are unlike its "Mainland" counterpart as Zantel hasn't yet until today fully launch 3G in Mainland Tanzania although they still have 3G coverage over the Dar es Salaam region only.

Congrats to all living in Zanzibar as now you will no longer struggle by getting stuck using the slow Edge speeds which was a pain considered almost everywhere in Tanzania people are enjoying high speed internet from other carriers who provide 3G services in Mainland Tanzania.

Upon introducing 3G coverage in Zanzibar they have announced new low-priced internet bundles for Zanzibar but I bet they can still be used in Mainland Tanzania too. The following are the prices Zantel introduced following their 3G announcement:

1. 5GB per month for 35,000 Tshs.

2. 2GB per month for 15,000 Tshs.

3. 1GB per week for 7,000 Tshs.

4. Unlimited (Uncapped) Volume in 3days for 5,000 Tshs.  

Don’t forget to like us on Facebook and follow us on Twitter:)

Thursday, May 10, 2012

Vote For Us In The Tanzanian Blog Awards.


We proudly announce that we have been nominated in the Tanzanian Blog Awards 2012. We are nominated in the Best Newcomer Blog and Best Out of Towner Blog categories. We are asking you readers of this blog to support us by voting for us so we can be on top of the directory listings of the Best New Blog in Tanzania and other categories we were nominated on.

Voting will commence on Mid June although they haven't specified the actual date, the voting will be for 2 weeks time meaning that you people will be having enough time to vote for us as many times as you want. Again please make it happen! vote for us when voting starts and stay updated as i will be posting more articles on the days to come. Thank you and have a great day:)

Saturday, April 14, 2012

Which Is The Best Browser in 2012


Browsers are what people use to search and browse the web every day, but seeing that there are many browsers providing different functions and usability, the browser market gets flooded by some new browsers trying to be popular too, they are still some browsers which people use the most and are undisputed in the friendly UI and great speed combined with customization to make up one wonderful browser.

Lets take a look at the present popularity of the Top 3 browsers in 2012:

 Mozilla Firefox as one of them has a great user base at 36.3% share of the browser market according to “w3schools.com” while the leading popular browser by Microsoft: Internet Explorer 9 at 18.9% its showing that this browser is currently a failure and needs to improve because its share is losing in very fast pace. Another browser which is Google chrome leading this year at 37.3% clearly shows how people love Google Chrome and Google did their best to advertise their browser everywhere around the web to reach and increase its user base easily.

Now which is regarded as the best browser in 2012?

Looking at other browsers usability and customization like Firefox it used to be the best and most popular rising browser in the past but it failed and it loosed most of its user base to Google Chrome because it was clustered with high memory usage and it hanged the browser most times and same goes to Microsoft Internet Explorer 9 its current user base is deteriorating as people move to more customizable and UI Friendly browsers. But Google Chrome has never seen a drop on its user base as of late and shows that its currently the rising browser on the market.

After having an insight of the other browsers finally the crown goes to..... (You guessed it)Google Chrome. Google Chrome is regarded the best browser because it provides the maximum browsing speed, has extensions/add-ons which have nearly the same library of extensions as Firefox but much better as chromes extensions have more “Quality” over what Firefox has which is “Quantity”. Chrome is known for being not quite resource heavy, it even has a task manager too for managing and reducing memory usage try pressing “Shift+Esc” you can kill processes of different tabs and extensions easily, last but not least it has  an awesome clean and simple friendly UI which is the part where people look at most when choosing the browser for their needs.

So here we have our winner as “Google Chrome” but we’d like to know which is your best browser in 2012? Which browser are you currently using now? Please let us know from the comments section below.

Thursday, April 12, 2012

How to Run Android Apps On Your PC


Android is the most loved and famous mobile OS to date.It indeed has the best apps collection even rivaling Apples App Store as it continues to grow more apps are submitted and published on the Android Market(Google Play).So you love your mobile apps that you want to have them on other devices? Thing is that you can even run your Android apps on your PC/Laptop, Cool huh?

What makes that possible is just software that you need to install in both your phone and PC and that’s BlueStacks. BlueStacks App Player lets you run your Android apps fast with full screen on Windows PCs and tablets. It supports the most popular Desktop OS that is of course “Windows 7” for now and maybe MAC OS X support may be coming on later although the ETA is not known yet.

How to exactly run Android apps on PC?

Step1:Alright guys simple, you just need to have the latest Bluestacks software for your PC which you can get here.

Step2:Install the Cloud Connect App on your android phone which will allow you to sync your android apps from your phone to the Bluestacks Software so you could run the apps you own from your phone on your PC too.Download the latest version of Cloud Connect here.

That’s all, it’s pretty simple and fast it will seamlessly sync with your android apps and run them on your desktop and your good to go! If this was helpful to you please don’t forget to like us on Facebook or follow us on Twitter. Don’t know where to start? You couldn’t get the apps to run on your PC? Don’t worry just leave a comment down below and we will help you through.


Tuesday, April 10, 2012

How To Get Verified On PayPal in Tanzania.


PayPal is the most loved way to buy items worldwide using online shops like EBay, Amazon and others. In fact it’s the number one used service which helps to shop online quickly and securely.

Why choose PayPal?

When paying for items you purchased on an Online Shop you would normally provide your Credit/Debit card details and your card verification number. Now this could be dangerous if someone knows your CRDB Card number and the CVV (Card Verification Code) printed at the back of your card, he could steal all your money and unfortunately you would end up being bankrupt. Now to avoid all this fuss you need to register your Credit Card/Debit Card with PayPal because they will help you to purchase anything online without the need of your credit card/details to be revealed to the Online Store you’re buying from.

For more info on why to choose PayPal please read further here.

Does PayPal charge me?

There's no charge to open a PayPal account and also there is no charge to purchase items using your PayPal account.

After understanding the reasons to why you need PayPal for your online purchasing needs. Let’s get straight to the fun part on how to actually Register/Verify your Credit Card on PayPal with the following easy steps:

Step1: Signup for a PayPal account here and choose Individual account.

Step2:
Login to your PayPal Account, click Get Verified and choose “link and confirm my card”.

Step3: Enter your credit card details correctly .Choose Visa if it’s a VISA Card, Card number is the 16 Digit Number in front on your CRDB VISA Card and CVV are the last three digits on your CRDB VISA Card.


To verify with PayPal they will charge you 1.95 USD and refund you after you have confirmed your card. To confirm your card they send a 4-digit PayPal code to your CRDB Bank account. You would need to check it on your CRDB Credit card statement. It will take 2-3 days for the 4-digit PayPal code to appear so be patient.

NOTE: To use the Internet Banking service from CRDB you first need to request them to activate the service on your VISA debit card with CRDB if you haven’t done that yet.

Step4: To check for the 4-digit PayPal code login to your CRDB Internet Banking Account. Go to Accounts>”Your account name”>Last 20 transactions and you will see a statement listed like this:
After you got your 4-digit PayPal code just enter it on your PayPal account for final verification of your card and you’re finally ready to use PayPal for online purchases.

I hope I have been clear enough for even a newbie to understand this process of verifying your VISA Card with PayPal .Don’t forget to like us on Facebook and Be a Fan, follow us on twitter! If you still don’t understand then don’t hesitate to leave a comment on the comment box below we are here to help you.

Sunday, April 8, 2012

How To Shop Online Using a Debit/Credit Card In Tanzania


Want to start shopping online in Tanzania? But don’t have a clue on where to start and what you need to do to get you started? Then look no further as am going to guide you through the process of being able to purchase anything online in Tanzania using a Debit/Credit Card.

Firstly, you need to open a Bank Account in any Bank which supports Online Shopping e.g. CRDB, Barclays but in my guide I will explain on how to open a CRDB bank account as I personally never opened a Barclays bank account but I think the steps should be the same.

Step1: Open a CRDB bank account first by going to your nearest CRDB Bank branch. Ask them for a Form to open a new Personal savings bank account.

Step2: Fill out the form with the requirements they need as follows
  • Form should be filled with black ink and all capital letters.
  • You should have 4 passport pictures with a white background which you can take from your nearest Photo Point.
  • You should have a copy of your ID whether it’s a Passport, Driver’s License (New Driver’s License)
  • Choose a Debit/Credit Card type if Visa or Master Card as they all support Online Shopping.(It’s free and takes a maximum of 2 weeks for your card to be ready, if ready they will SMS you)
  • You should Have Two Referees (wadhamini) who will be responsible for anything that happens to your account. (You could ask anyone to be your referee as long as you trust him/her)
  • Initial deposit for opening an account is only 20,000/=

Step3: After opening your CRDB Bank account or already had an account skip to Step 4.

Step4: Apply for Online shopping after getting your Debit/Credit card ready, just go to your nearest CRDB bank branch and request them to enable your account for Online shopping and Online banking service.

Step4: They will give you several Forms just fill them out and it would take a maximum of 2 weeks for your Online Banking and shopping service to be ready.


After all this process you will have a fully working CRDB Debit/Credit Card with online Shopping and Online Banking Service all ready for Purchasing anything online from stores like EBay, Amazon and other Online Shops.

Hope you all enjoyed this guide and I have tried to be helpful as possible, share it with your friends on Facebook by liking us, if you have any questions, comments or don’t understand anything just leave a comment below and we are ready to help you out. 

Saturday, April 7, 2012

How to Install Windows 7,Vista,XP using a Flash Disk


Eventually sometimes you might run into a situation where you don’t have a DVD Drive on your computer or you’re using a netbook which doesn’t have a DVD drive then the option left out would be to install using a USB Flash disk.

Why use a flash disk over DVD discs?

-It’s much faster installing with a USB flash disk because of the nature of the drive speed its much fast than a DVD disc’s read speed.

-Flash disks can be used to store more than one operating system for installing.

-Flash disks are more fail proof compared to Optical discs, am looking at the scratchy DVD discs, as DVDs can easily scratch but a flash disk is a just a simple solid drive.

Now just follow the following easy steps on how to make a USB Flash drive to be as a Windows 7 Installer Disc, probably this is the easiest way you would ever find on the internet.
How to install Windows 7 using a USB drive?

Step1: Download a program called YUMI here, we are going to use this to prepare the windows installation for use.

Step2: Open the program and select the Flash disk drive letter of where you want the installation to be prepared to.


Step3: Select the type of Windows you will choose for installation, which in this case is Windows 7, just scroll down that list you will find “Windows Vista/7 installer”

Step4: After selecting your Operating System of choice, you need to browse and select to your .ISO image file containing the Windows Installation.

Step5: You just click Create and accept any prompts and your set!

When it finishes you will have a fully working Flash disk with Windows 7 Installer ready for installation in any laptop or PC.

Friday, April 6, 2012

Gain Admin access using guess account for Beginners


After writing about gaining admin access in school computers, today I make a follow up of that article with gaining admin access using a guest account. This is more useful if you can’t use the first method to gain admin privileges.

So, normally a guest account wouldn’t have access to admin files or any normal user’s files because he doesn’t have the required permissions to access them. But do you know that you could find a way around and gain admin access? It’s pretty easy, let me explain you the trick with the following steps.

Step1: Go to C:/Windows/System32 and copy the file cmd.exe and paste it on your desktop.

Step2: Rename the file cmd.exe to sethc.exe and copy-paste it to C:/Windows/System32  windows will prompt that file already exists but just press OK.

Step3: Now you need to logoff the guest account and try to gain access to the admin account.

Step4: After logging off, at the login screen press shift 5 times, Tadaa! Command prompt will appear with Admin privileges so with admin privileges you can add new users or change files using command prompt.

Now after gaining access with admin account using this trick you can add users, change users, delete users, files and do pretty much anything an admin would normally do.

To add a new user type command as:

  • net user username /add

To add the user to admin group type command as


  • net user localgroup administrators username /add

You would want to get the latest tricks and tips for Windows please like us on Facebook and subscribe to our Blog feed. As more articles are coming your way so keep yourself updated!


Wednesday, April 4, 2012

How To Get 50GB Of Box.com Cloud Storage For Free


As technology evolves we see more importance of saving our files on the cloud. This generation fires up the start of a new world of storage as everything is moving to the cloud (literally). Cloud storage shows that there is no need of saving your backup on your local hard disk as it can get damaged anytime or maybe get stolen or lost and have all your data gone!

But saving on the cloud is not affected by any of these problems. As it is stored and can be retrieved anytime by just logging into your account and download your data from the cloud. So it’s really important that you save all your important files to an online storage service before you lose them.

Box.com is one of the providers of Cloud storage but they usually only provide 5 GB of free space or you could pay for 19.99 per month! for 50GB.But I will guide you on how to get free 50GB.

How do you get free 50GB Box.com storage space?

Well you have to have an android phone for this to work as it involves installing of an android application which helps you to get the free 50GB storage. YES! On any “android phone”, it works even on Huawei Ideos from Tigo Tanzania.

 Just follow the following easy steps.

Step 1: Sign up for a Box.com account first, Sign up here.

Step 2: Download Android app from here.

Step 4: Transfer it to your Phone with a USB Cable or Bluetooth connection.

Step 5: Install the app "com.redphx.boxnet-1.1.apk" in your android phone and open it, input your email address and password you signed up with.

Step 6: Press "Upgrade to 50GB!!!" you will see a message popup saying you have been upgraded to 50GB.


Enjoy your free 50GB Cloud storage from the popular box.com! Don’t forget to like us on Facebook and follow us on Twitter.

Tuesday, April 3, 2012

How to easily Root any android Phone


Android is a mobile OS known to give users freedom to use their phones as they please. But it still has some restrictions which people often want to overcome. Looking at the competition, meaning iOS from Apple. There are so many restrictions that you can’t use your phone at its full potential, but with the help of Jailbreaking your phone you can open the doors for it for many other tweaks and apps to run on it.

So it’s the same as an Android phone, to have more features and tweaks not found on Stock Android Market (Google Play) you need to Root your phone then you will have support for Root Directory Browsing, support of other apps that need SU permissions. To root your phone the easy way just follow the following steps.

Steps to root your Android Phone.

Step1: You need to enable USB Debugging mode on your Android: Tap Menu > Settings > Applications > Development. Then enable USB debugging.

Step2: Check if your SD card is not mounted: Tap Menu > SD Card & Phone Storage, and (if available) tap Unmount SD Card.

Step3: Download SuperOneClick here. http://www.4shared.com/rar/9ocvoybZ/Super_One_Click_233.html

Step4: After Download unzip the file and run SuperOneClick.exe


Step5: Plug in your Android Phone into your computer via the USB cable that came with the phone,(Remember you should install your phone’s drivers first!)

Step6: Finally your phone will be detected and just click the Root button on SuperOneClick.

After following these steps properly, you should get a fully Rooted Android Phone and enjoy the freedom and more features of a rooted phone. If you don’t understand or can’t follow up with this Tutorial properly then I will kindly help you, just fire up a comment or question down on the comments section below.

Monday, April 2, 2012

How to Gain Admin Access in School Computers

Today, am sharing a really cool and easy trick for everyone. This will be my first entry in the computer tricks section of our site. It’s short and pretty self-explanatory tutorial with easy to understand simple commands.


 So, you wanted the power to access your school admin computers? At IFM (Institute of Financial Management) or DIT (Dar es Salaam Institute of Technology) or any college but could not! Or maybe simply because cmd was disabled? Then worry out, just follow these steps.

Step 1. Open Notepad and type in "command.com" without quotation marks.

Step 2. Save file as schoolwork.bat and make sure you selected All Files while saving.


Step 3. Run the .bat file and it should bring up command prompt with admin privileges.

Now you can enjoy your privileges by adding some users on your school computers or companies computer and probably do whatever you want to do as you have admin privileges.

Don’t forget to follow us on twitter,Like us on Facebook and please leave your comments on the section below.

Saturday, March 31, 2012

Clean up and increase the speed of your PC with CCleaner


Hard disk out of space? Yeah! We know that many people in Tanzania download movies, music and other games which take a lot of Capacity on your Hard disk. After using your computer for a long time the computer becomes populated with unwanted data commonly junk files like Web history files, Log files which all take up unnecessary disk space. As the Disk space reduces the computer speed goes down, so how do you make it fast?

To reduce disk usage and speed up your PC we recommend CCleaner. CCleaner is a disk cleaning software which cleans up most of the old junk which stays on your Hard drive unneeded.Its a great alternative to the windows app Disk Cleanup so if your stuck to the old age Disk Cleanup utility which comes with Windows 7, you might consider trying CCleaner.

Why do we recommend CCleaner?

Well, we recommend CCleaner as its simple to use and has a great user interface.This user friendly tool can analyze your system to check any unwanted space occupied by unwanted data, cookies,recent documents,internet files, history files, temporary files and log files.A user can then delete the data and recover significant amount of the hard disk capacity.You can download CCleaner here.

You should definitely give it a try and see if it helped you.Post any questions regarding the software in the comments section below.

Thursday, March 29, 2012

Forgot your Android pattern lock?Here is the easy way to reset it.


Why the phone is sometimes locked out?
-Possibilities are that you have attempted too many pattern attempts.
-Someone else was playing with your lock screen code that it locked because of many attempts.

How to unlock any android phone which is locked out?

-If pattern was wrong 5 times and then it locked, select “Forgot Pattern”
-It will ask you for your email ID and password, if entered correctly then phone will successfully unlock.

What if you forgot your email ID or password?

Well then you need to hard reset your phone, which will delete all your settings and apps on your phone.SD card data will be preserved so worry not.
  • Shutdown your phone by holding down the power button.
  • Hold down the Volume Up and Power button simultaneously. Optional:For other phones try holding down the Volume down button and power button.(or Vol down+Up)
  • Continue holding the Volume Up and Power buttons until the phones logo screen is displayed.
  • When the phone’s logo screen is displayed, release the Power button but continue holding the Volume button until the Android System Recovery menu is displayed.
  • Once you are on the Android System Recovery menu, select the wipe data/factory reset option.  Moving the selection up and down is done with the Volume Up and Volume Down buttons.  Once you have the wipe data/factory reset option highlighted, you select it by touching the Home button.
  • Once you have chosen the factory reset option, you will see a confirmation screen.  Highlight the Yes delete all user data option and touch the Home button to select it.
  • The process of wiping the phone should only take a few seconds and when it is finished, you will be returned to the Android System Recovery menu.
  • Highlight and select the reboot system now option
  • You phone will now reboot back into normal mode
Don't forget to like our Facebook page and Follow us on Twitter.Didn't understand some steps?Please let us know your doubts in the comments section below.

Monday, March 26, 2012

How to download videos from Youtube - the easy way


YouTube is the most popular and loved video sharing site, with of YouTube video views pouring every day ,among those are Tanzanians but are just curios that there is a feature which is missing in YouTube which seems to give a headache to some people who would love it!, what is that feature? It is.... (You guessed it!) “Downloading videos from YouTube”

YouTube won’t support the downloading of videos from its site because it wants to stick on its root as a site for “watching videos” but not downloading and saving them. But you can get around this limitation by using third party websites(without the need of a software) to download videos from YouTube.

How to Download Videos From YouTube?

Step1:Copy the YouTube address of the video you want to download.


Step2:Open the site keepvid.com or saveyoutube.com and paste the link of your youtube video


Step3:After a few seconds you will get the options to download the video in different formats!


It’s easy as that. Don’t forget to like our page. Share on Google plus, Facebook or follow us on Twitter.


Sunday, March 25, 2012

How to make Windows 7 look like MAC OS X Lion Mountain


Apple released the developer edition of their latest creation, which is MAC OS X Lion Mountain and it has many more features coming soon, but what if your one of the people like me who don’t have a MAC Book or an IMac and want to have the same looks like how Mac looks visually stunning!

Then your 2 steps! Away from turning your Windows 7 PC to look like a MAC:


Step1: Download MAC OS X Skin Pack for Windows 7 here
OR for Windows 8 Here.

Step2:Open the downloaded file and follow through the installation wizard


After installation then you should be having a new and fresh look for your PC just like a real MAC!

Please like us on Facebook and share the article with others. And don’t forget to leave any comments in the comments box below.

Thursday, March 22, 2012

Which is the best antivirus software in Tanzania

This is my Eleventh entry on my Tech Blog techintz.com, today am writing up on which are the Best Antiviruses in the Market which are available in Tanzania, let alone worldwide!

Everyone knows that viruses exist around nearly every corner of the digital world we are in, especially when connected to the Internet. But people still use the internet as a reliable source of different information, but everything must have its opposite, so does the internet!  It provides very useful information but at the same time the internet is full of viruses, malwares throughout the web! So to protect yourself against the viruses you need to use an antivirus.

Here are our choices for some of the best antivirus programs for Windows:

1.KASPERSKY INTERNET SECURITY:

It’s proven to be the most loved and highly recommended antivirus software everywhere globally, many people and companies in Tanzania use it, Kaspersky is known for its effective antivirus software with a beautiful user interface and great virus definition database.

Major features of Kaspersky Internet Security:
•  Real-time proactive protection against all Internet threats
Prevents all types of known and unknown malware from infecting your computer.
•  Safe Surf feature for unparalleled online security
With Safe Surf enabled, you’ll never be exposed to harmful or offensive websites. Regular database updates from Kaspersky Lab means that Safe Surf will automatically block undesirable websites as they appear. Just switch it on.
•  Feature-rich and effective Parental Control
The product’s advanced Parental Control features can block, limit and log applications and web access, so your children stay safe online.
•  Unique Safe Run mode for apps & websites
Safe Run mode lets you run suspicious applications and websites in a specially isolated environment where they cannot damage your system.
•  Computer tune-up tools
Take advantage of additional tools and services that provide enhanced protection for your computer and optimize your system, such as: Rescue Disk, Vulnerability Scan, System Restore, Browser Configuration and Privacy Cleaner.


How much does Kaspersky Internet Security cost in Tanzania?

-Multi User License = 49,000Tshs
-1 User License = 39,000Tshs


2.ESET SMART SECURITY:


Eset is one of the best antivirus worldwide, because it doesn’t lag/hog your computer. It needs minimum resources on your RAM, if you’re having low ram I would recommend Eset Smart Security. It too has a big virus definition database like Kaspersky and insures your computer is at maximum security every day.

 Major features of Eset Smart Security:
•    Proactive Protection – ESET's smart ThreatSense® technology offers multiple layers of protection with precise identification of even never-seen-before forms of malware.
•    Built for Speed – ESET Smart Security 5 is lightning fast and operates smoothly in the background, so you won't even notice it's there.
•    Easy on You – From its compact and intuitive user interface to its minimal use of alerts, you'll be up and running in a snap without undue interruptions.
•    Seamless Updates – Security updates are discreetly sent to your computer, ensuring your defenses are always at their strongest.

How much does Eset Smart Security Cost in Tanzania?
-Unfortunately its not available in Tanzania yet but you can buy online here.

For others who just need free antivirus software or don’t have enough budget for commercial solutions then I would highly recommend;

1.MICROSOFT SECURITY ESSENTIALS:

Microsoft Security Essentials made the list as the best free antivirus because it covers up to date virus definitions and created by the Microsoft security team, so expect a good Interactivity if you’re using Microsoft Windows.

Major Features of Microsoft Security Essentials:
•    Comprehensive malware protection
•    Simple, free download
•    Automatic updates
•    Easy to use


So these are our recommendations to which are the best antivirus software in Tanzania. If you’re using any other antivirus program, then you’re probably not fully protected and you should get one of these antiviruses being used and recommended by many Tanzanians.

Which antivirus do you think is the best for you?what are your choices?Please let us know on the comments section below.