Right Click Protection

Showing posts with label Software. Show all posts

Saturday, January 26, 2013

How to enable,bring back the start menu on Windows 8

Windows 8 which has already started shipping to all new PC's or Laptop pre-installed. I myself have bought a new Laptop(Ultrabook) which is the "Zenbook Prime" and Yes! it does come with Microsoft's Latest Operating System. Overall its getting pretty good reviews on the internet but there is one issue that almost every reviewer has pointed out, and this issue is why am writing out this blog post to help people who think its a problem for them.  

So are you one of those people who have already switched to the new Microsoft Operating System?
If yes then the first thing you would notice is when using the new Windows 8 Operating System is that it doesn't have the start menu anymore. There is a way of bringing it back, I will take you through a series of steps to bring the old start menu back.

Step 1: Download StartMenu8 from here


Step 2: Install StartMenu8.

Step 3: Enable the start menu by executing/running StartMenu8.

Step 4: Done! you finally have your old start menu back..simple as that.


Alternative Start menu enablers you can try:

Classic Shell 


I hope this short tutorial has been informative to you guys, if you find this useful follow us on twitter @techintz to get the latest updates from us. Don't forget to share it on Facebook with your friends. If you have any questions regarding this post, just leave a comment below and I will get back to you as soon as possible. 

Wednesday, August 8, 2012

How to partition a Hard disk the Easiest way without formating


It is known that every device must have some form of storage, it shows how important Hard drives are for its use, HDD technology has been evolving even as I type now, from HDD(Hard Disk Drive) to SSD(Solid State Drive). Hard disks are used mainly for storing user data, other media or important documents and even backup of your system, but a problem arises when you have only one Hard disk and you need to use the only one for both purposes like Backing up your system and another partition for Storing Media or for any possible reason you would like to partition your Hard disk for.

Well it’s all possible now the easy way, thanks to Easeus Partition you can easily partition your hardisk into different types of file systems at a click of a button. Easeus is highly praised software for its partitioning capabilities on the fly without the need of formatting the whole Hard drive again. It was once known as Partition Magic but they changed their product name to Easeus Partition Master.

To partition your hard drive is even possible using the native windows utility diskutil.exe but it doesn’t have as more options for partitioning as Easeus Partition Master. To use Easeus follow the steps described below:

Step1: Download Easeus Partition Master Home Edition then proceed with the installation.

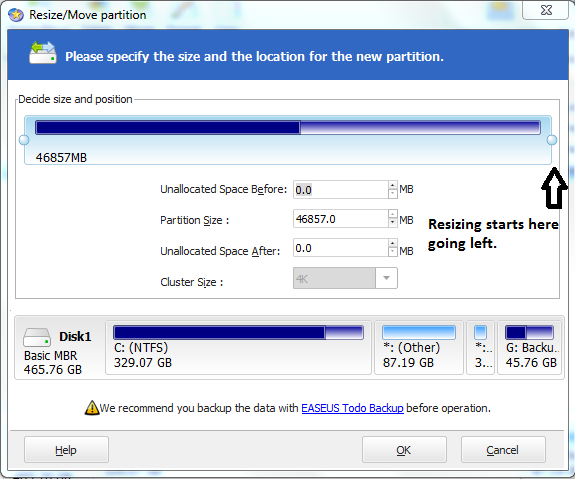
Step2: After installation, run the program on your Desktop. Select the drive you want to partition and you will have five options on the top, Select Resize/Move.


Step3: On the Resize/Move window, just resize the drive you selected by dragging the bar from Left to right to divide the hard disk into two parts and click OK.


Step4: You will see a new “Unallocated” disk on the list of your disks. Just select it and click Create then OK, last of all click "Apply" to start the operation. That’s it! You will have your newly created Partition.


I hope this has been the easiest guide to understand as anyone can do it pretty easily with the help of images. Don’t forget to click the Facebook like button below and follow us on Twitter @techintz

Sunday, July 22, 2012

How to Combine/Merge/Join/Open Files with .001, .002 Files


When downloading different type of content from the internet, you might find that some of the files that you download have been split into many parts like .001, .002, .003. First thing to know is that these files are not split archive files and you can't rename them to .rar extension for them to extract cause you will end up with an error extracting content.To combine the .001, .002 files together you need a software called HJSplit. I will be explaining in the following easy steps on how to combine these types of files using HJ-Split below:

  • Download HJSPLIT from here.
  • Open HJSplit and click the Join button. 


   NOTE:Make sure you have all the .001, .002, .003 files together in one folder
  • Click the Input file option, choose the first .001 file in the folder its located.

  • Click Start, it will start joining all the files together to make one final file.


I hope this post has been informative for you, if you have any comments please let us know at the comments section below. Don't forget to like us on Facebook and follow us on Twitter @techintz


Saturday, June 16, 2012

How to share your internet connection wirelessly with Windows 7


As many of you know more internet users increase daily which is by then becoming part of our lives and what is behind social media through using Facebook, Twitter not to mention many other sites, people are paying more for internet subscriptions to their ISPs in one building, but what is the solution if you only want to pay for one subscription and share the internet connection all over your house?

Look no further as you can now easily share your broadband or Airtel/Tigo/Vodacom or Zantel 3G internet connection wirelessly without extra cost of buying a MIFI device, you can use your Laptop or Personal Computer to share your connection free of charge using a program called Connectify.

Connectify features:

-Easily create a Wi-Fi hotspot to share and collaborate with your friends, co-workers, and mobile devices.
-Got a mobile broadband card or adapter? Now you can share that single connection with all your other devices!

How does it work?

It’s easy! Listed down are the steps:

1. Download Connectify 1.2 from here, install it and access it down the system tray on the bottom left of your desktop.

2. Configure Connectify  by filling in your preferred Wi-Fi name, password and the internet connection which you want to share wirelessly.


3. Finally, just click the “Start Hotspot” button to start your hotspot and BAM! You have now successfully shared your internet connection wirelessly!


NOTE: If you have any firewall enabled then you need to disable it to allow other devices to connect to your Wi-Fi hotspot.


I hope this has been informative for you, don’t forget to like us on Facebook and follow us on Twitter @techintz, didn’t understand any step? Let us know down the comments section below.

Thursday, May 31, 2012

How to Remove Remaining Unwanted Programs


Ever had a program that's installed in your system and wanted to uninstall it but whenever you try to fully uninstall it, some unwanted remaining files of that program would still remain on your computer?

That’s so annoying especially us here in Tanzania most of the users are using Windows Operating system so many of the programs will still leave some unwanted dll files, registry files or even shortcut which you would like to get rid of completely.

So upon my busy days surfing on a local internet café in Dar es Salaam, I found a really nice software which would be used just for the purpose of fully uninstalling programs which don’t example have an uninstallation file or maybe just a normal program it will automatically remove for you all the unwanted files the program leaves and any traces of the program from the registry so therefore it will save you more disk space.

Software’s name is Revo Uninstaller you could get the free version or the Pro version if you loved it so much.Revo uninstaller has many other features listed in its site just go check them out, so what are you guys waiting for? Just go ahead to www.revouninstaller.com and download the latest version of Revo Uninstaller. Don’t forget to follow us on Twitter @techintz, like us on Facebook and last but not least to leave us a comment below on how you really loved Revo Uninstaller for your uninstallation needs.

Saturday, April 14, 2012

Which Is The Best Browser in 2012


Browsers are what people use to search and browse the web every day, but seeing that there are many browsers providing different functions and usability, the browser market gets flooded by some new browsers trying to be popular too, they are still some browsers which people use the most and are undisputed in the friendly UI and great speed combined with customization to make up one wonderful browser.

Lets take a look at the present popularity of the Top 3 browsers in 2012:

 Mozilla Firefox as one of them has a great user base at 36.3% share of the browser market according to “w3schools.com” while the leading popular browser by Microsoft: Internet Explorer 9 at 18.9% its showing that this browser is currently a failure and needs to improve because its share is losing in very fast pace. Another browser which is Google chrome leading this year at 37.3% clearly shows how people love Google Chrome and Google did their best to advertise their browser everywhere around the web to reach and increase its user base easily.

Now which is regarded as the best browser in 2012?

Looking at other browsers usability and customization like Firefox it used to be the best and most popular rising browser in the past but it failed and it loosed most of its user base to Google Chrome because it was clustered with high memory usage and it hanged the browser most times and same goes to Microsoft Internet Explorer 9 its current user base is deteriorating as people move to more customizable and UI Friendly browsers. But Google Chrome has never seen a drop on its user base as of late and shows that its currently the rising browser on the market.

After having an insight of the other browsers finally the crown goes to..... (You guessed it)Google Chrome. Google Chrome is regarded the best browser because it provides the maximum browsing speed, has extensions/add-ons which have nearly the same library of extensions as Firefox but much better as chromes extensions have more “Quality” over what Firefox has which is “Quantity”. Chrome is known for being not quite resource heavy, it even has a task manager too for managing and reducing memory usage try pressing “Shift+Esc” you can kill processes of different tabs and extensions easily, last but not least it has  an awesome clean and simple friendly UI which is the part where people look at most when choosing the browser for their needs.

So here we have our winner as “Google Chrome” but we’d like to know which is your best browser in 2012? Which browser are you currently using now? Please let us know from the comments section below.

Thursday, April 12, 2012

How to Run Android Apps On Your PC


Android is the most loved and famous mobile OS to date.It indeed has the best apps collection even rivaling Apples App Store as it continues to grow more apps are submitted and published on the Android Market(Google Play).So you love your mobile apps that you want to have them on other devices? Thing is that you can even run your Android apps on your PC/Laptop, Cool huh?

What makes that possible is just software that you need to install in both your phone and PC and that’s BlueStacks. BlueStacks App Player lets you run your Android apps fast with full screen on Windows PCs and tablets. It supports the most popular Desktop OS that is of course “Windows 7” for now and maybe MAC OS X support may be coming on later although the ETA is not known yet.

How to exactly run Android apps on PC?

Step1:Alright guys simple, you just need to have the latest Bluestacks software for your PC which you can get here.

Step2:Install the Cloud Connect App on your android phone which will allow you to sync your android apps from your phone to the Bluestacks Software so you could run the apps you own from your phone on your PC too.Download the latest version of Cloud Connect here.

That’s all, it’s pretty simple and fast it will seamlessly sync with your android apps and run them on your desktop and your good to go! If this was helpful to you please don’t forget to like us on Facebook or follow us on Twitter. Don’t know where to start? You couldn’t get the apps to run on your PC? Don’t worry just leave a comment down below and we will help you through.


Saturday, April 7, 2012

How to Install Windows 7,Vista,XP using a Flash Disk


Eventually sometimes you might run into a situation where you don’t have a DVD Drive on your computer or you’re using a netbook which doesn’t have a DVD drive then the option left out would be to install using a USB Flash disk.

Why use a flash disk over DVD discs?

-It’s much faster installing with a USB flash disk because of the nature of the drive speed its much fast than a DVD disc’s read speed.

-Flash disks can be used to store more than one operating system for installing.

-Flash disks are more fail proof compared to Optical discs, am looking at the scratchy DVD discs, as DVDs can easily scratch but a flash disk is a just a simple solid drive.

Now just follow the following easy steps on how to make a USB Flash drive to be as a Windows 7 Installer Disc, probably this is the easiest way you would ever find on the internet.
How to install Windows 7 using a USB drive?

Step1: Download a program called YUMI here, we are going to use this to prepare the windows installation for use.

Step2: Open the program and select the Flash disk drive letter of where you want the installation to be prepared to.


Step3: Select the type of Windows you will choose for installation, which in this case is Windows 7, just scroll down that list you will find “Windows Vista/7 installer”

Step4: After selecting your Operating System of choice, you need to browse and select to your .ISO image file containing the Windows Installation.

Step5: You just click Create and accept any prompts and your set!

When it finishes you will have a fully working Flash disk with Windows 7 Installer ready for installation in any laptop or PC.

Saturday, March 31, 2012

Clean up and increase the speed of your PC with CCleaner


Hard disk out of space? Yeah! We know that many people in Tanzania download movies, music and other games which take a lot of Capacity on your Hard disk. After using your computer for a long time the computer becomes populated with unwanted data commonly junk files like Web history files, Log files which all take up unnecessary disk space. As the Disk space reduces the computer speed goes down, so how do you make it fast?

To reduce disk usage and speed up your PC we recommend CCleaner. CCleaner is a disk cleaning software which cleans up most of the old junk which stays on your Hard drive unneeded.Its a great alternative to the windows app Disk Cleanup so if your stuck to the old age Disk Cleanup utility which comes with Windows 7, you might consider trying CCleaner.

Why do we recommend CCleaner?

Well, we recommend CCleaner as its simple to use and has a great user interface.This user friendly tool can analyze your system to check any unwanted space occupied by unwanted data, cookies,recent documents,internet files, history files, temporary files and log files.A user can then delete the data and recover significant amount of the hard disk capacity.You can download CCleaner here.

You should definitely give it a try and see if it helped you.Post any questions regarding the software in the comments section below.

Sunday, March 25, 2012

How to make Windows 7 look like MAC OS X Lion Mountain


Apple released the developer edition of their latest creation, which is MAC OS X Lion Mountain and it has many more features coming soon, but what if your one of the people like me who don’t have a MAC Book or an IMac and want to have the same looks like how Mac looks visually stunning!

Then your 2 steps! Away from turning your Windows 7 PC to look like a MAC:


Step1: Download MAC OS X Skin Pack for Windows 7 here
OR for Windows 8 Here.

Step2:Open the downloaded file and follow through the installation wizard


After installation then you should be having a new and fresh look for your PC just like a real MAC!

Please like us on Facebook and share the article with others. And don’t forget to leave any comments in the comments box below.

Thursday, March 15, 2012

Top 10 Tips To Make PC Games Run Faster


Ever started a game to find out that it runs slow on your system? Whether you’re playing the latest PC Games, or running a low-end system it all adds up on making a Game run slowly, but no! That doesn’t mean you can’t play the latest games! By the help of these tips you can get the game running faster into playable speeds.


1. Reduce game screen resolution to lowest if possible.

2. Reduce the game quality to low or lowest setting if applicable.

3. Kill any unnecessary services and processes.

4. Kill the running application and background apps as it frees up RAM.

6. Get up-to-date Video Card drivers from your Graphics card manufactures website.

7. Buy more memory, 2GB as minimum for Windows 7 but 4 GB is recommended.

8. Disable antivirus while running games as its taking up more system resources.

9. If you have enough budget, upgrade to a faster performing Graphics Card, Processor.

10. Disable Windows Aero in Windows 7 and any resource intensive theme installed.

If these tips won’t work out for you or have a PC with low RAM and want a fix to performance in One Click then you can try a performance boosting software called Game Booster.

Features of Game Booster:

-1-Click Boosting Game Performance Enhanced
Game Booster v3 can easily and fast close background processes and unnecessary Windows services, to speed up your game playing and avoid possible conflicts and incompatibility. With the innovative "Enhanced 3rd parties' services detection" technology, Game Booster v3 can automatically detect and close more unnecessary background services.

-Pure Gaming Environment with "Game Desktop" New!
Game Booster 3 now is able to provide you a pure "gaming environment" that leaves only the gaming window on the desktop; thus you will not be disturbed by other programs during your gaming.

-Tweaks System for Top PC Performance Enhanced
Game Booster v3 can tweak your PC for the ultimate system and Internet speed with a single click.

Download Game Booster from official site here: http://www.iobit.com/gamebooster.html

Don’t forget to comment on the article in the comments section below! Or like us on Facebook. :)

Tuesday, March 13, 2012

How to unhide Files hidden by a virus

Have you one day tried to insert your flash disk to find out that all the files and folders not showing up? means they are hidden?well..don't panic much, that is indeed a virus that is hiding all those files and folders.

E.g In the following picture you will see that it shows all shortcuts to those folders but you can't access them cause they are hidden by a virus.

So how can you revive/unhide your files?
Easy! we will use windows command Prompt, Just follow the following steps:

STEP 1:
Make sure your USB Flash disk is connected.


STEP 2:
In Windows 7:
Open command prompt by selecting Start>On the search Bar type "cmd" hit enter

In Windows xp:
Open command prompt by selecting Start>run>type "cmd" hit enter to open command prompt

After opening command prompt, it should look like this;


STEP 3:
Check the drive letter for your connected flash disk,if it was H:
In cmd type H:


Then type attrib -s -h /s /d *.*

hit enter and wait a bit for it to unhide.
Thats all!, if you followed this tutorial attentively then am sure you will get your files Unhidden in a minute.

Monday, March 12, 2012

How to make Vodafone K3571 or Tigo E153 modem to work in Ubuntu

Hello readers!

Alright, so today I will show you all on how to make the Vodacom k3571/Tigo e-153 or any Huawei and Tigo Tanzania modem to work in Ubuntu, as I have seen many people don't have any idea on how to make these modems work in Ubuntu;

Step 1:Downloading the software needed

Go to "http://www.sakis3g.org/#download" and download the software


32 bit users Download Here:http://www.sakis3g.org/versions/latest/i386/sakis3g.gz

64 bit users Download here:http://www.sakis3g.org/versions/latest/amd64/sakis3g.gz


Step 2:Running the software
After downloading open the file you downloaded, it will open and extract to "sakis3g" as an executable file,open it

Step3:Configuring sakis3g


After it has opened you need to configure it correctly to work, start by clicking -Connect with 3g
-It will prompt you to choose the correct interface choose interface #0
-it will work and ask you other network provider settings,fill in default provider settings if it asks you for APN type "internet" and if it asks for username and password just write as "internet" without the quotes! then it will successfully connect.


NOTE:If interface #0 won't work try Choosing interface#1

I hope you enjoyed my guide.Like this article,Share it with your friends on Facebook and lastly, don't forget to comment if you have any trouble making this work in the comments section below.